Friday, November 30, 2018

Configure a Google Tag Manager Account and Container

To create a GTM account and container :


Navigate to Google Tag Manager:
Go to https://tagmanager.google.com and log in with your Google account.

Enter an account name: Give your account name.


Enter a container name: Give your container name.


Create the container:
Click on the create button. Your Google Tag Manager container will be created, and you’ll be given with some HTML script code. This code must be placed on every page of your website.


Click OK to close the pop-up window and then you’ll be taken to the GTM admin screen.


Thursday, March 15, 2018

Integrate WSO2 API Store with an external IAM using the Okta OAuth Authorization Server

In this guide, we explain how to integrate the WSO2 API Store with an external Identity and Access Management (IAM) by using the Okta OAuth Authorization Server, which is an open source IAM, to manage the OAuth clients and tokens required by WSO2 API Manager. We have a sample client implementation that consumes APIs exposed by Okta OAuth.

For more information, please refer below doc [1] & video [2]:

Working with WSO2 kafka inbound endpoint

To use the Kafka inbound endpoint, download Apache Kafka.
To configure the Kafka inbound endpoint, copy the following client libraries from the <KAFKA_HOME>/lib directory to the <ESB_HOME>/repository/components/lib directory (Tested with ESB 4.9.0).
  • kafka_2.12-0.11.0.0.jar, 
  • scala-parser-combinators_2.12-1.0.4.jar, 
  • metrics-core-2.2.0.jar
  • kafka-clients-0.11.0.0.jar, 
  • zkclient-0.10.jar, 
  • metrics-core-3.2.2.jar, 
  • zookeeper-3.4.10.jar, 
  • scala-library-2.12.2.jar
Add jaas.conf file to <ESB_HOME>/repository/conf/security. Please refer this doc to get jaas.conf file.

Sample Inbound configuration

Following is a sample kafka configuration that can consume messages using the specified topic or topics :
<?xml version="1.0" encoding="UTF-8"?>
<inboundEndpoint xmlns="http://ws.apache.org/ns/synapse"
                 name="kafka"
                 sequence="request"
                 onError="fault"
                 class="org.wso2.carbon.inbound.kafka.KafkaMessageConsumer"
                 suspend="false">
   <parameters>
      <parameter name="coordination">true</parameter>
      <parameter name="interval">10</parameter>
      <parameter name="topic.names">test</parameter>
      <parameter name="value.deserializer">org.apache.kafka.common.serialization.StringDeserializer</parameter>
      <parameter name="bootstrap.servers">localhost:9092</parameter>
      <parameter name="poll.timeout">100</parameter>
      <parameter name="contentType">application/json</parameter>
      <parameter name="group.id">hello</parameter>
      <parameter name="key.deserializer">org.apache.kafka.common.serialization.StringDeserializer</parameter>
      <parameter name="inbound.behavior">polling</parameter>
      <parameter name="sequential">true</parameter>
   </parameters>
</inboundEndpoint>

It is also possible to add the above inbound configuration via the Management Console:


Run the following command to start the ZooKeeper server :

bin/zookeeper-server-start.sh config/zookeeper.properties

Run the following command to start the Kafka server :
bin/kafka-server-start.sh config/server.properties

Start the kafka producer using :
bin/kafka-console-producer.sh --broker-list localhost:9092 --topic test

After the executing the above command, a console will be prompt then send the following message using console producer :
{"test":"wso2"}

Configuring the sample scenario 

Create a sample sequence as below :
<?xml version="1.0" encoding="UTF-8"?>
<sequence name="request" onError="fault" xmlns="http://ws.apache.org/ns/synapse">
    <log level="full"/>
    <log level="custom">
        <property name="STATUS" value="Fetching inbound endpoint name"/>
        <property expression="$ctx:inbound.endpoint.name"
            name="inboundEndpointName" xmlns:ns="http://org.apache.synapse/xsd"/>
    </log>
</sequence>

The ESB console output will be like below :

[2018-03-15 15:08:38,436]  INFO - LogMediator To: , MessageID: 379c9c2a-7db1-4210-ba0f-7c550c93b9f3, Direction: request, Payload: {"test":"wso2"}
[2018-03-15 15:08:38,443]  INFO - LogMediator STATUS = Fetching inbound endpoint name, inboundEndpointName = kafka

Saturday, September 30, 2017

Read ATOM feeds using Apache Abdera

NewsFeedRead.java
import org.apache.abdera.Abdera;
import org.apache.abdera.model.*;
import org.apache.abdera.parser.Parser;

import java.net.URL;
import java.util.List;

public class NewsFeedRead {
    public static void main(String[] args) {
        Abdera abdera = new Abdera();
        Parser parser = abdera.getParser();

        try {
            URL url = new URL("https://news.google.com/news?output=atom");
            Document<Feed> doc = parser.parse(url.openStream(), url.toString());
            Feed feed = doc.getRoot();
            // Get the feed title
            System.out.println("Feed Title: " + feed.getTitle());

            // Get the entry items...
            for (Entry entry : feed.getEntries()) {
                System.out.println("Title: " + entry.getTitle());
                System.out.println("Unique Identifier: " + entry.getId().toString());
                System.out.println("Updated Date: " + entry.getUpdated().toString());
                System.out.println("Published Date: " + entry.getPublished());
                System.out.println("Content: " + entry.getContent());

                // Get the links
                for (Link link : (List<Link>) entry.getLinks()) {
                    System.out.println("Link: " + link.getHref());
                }

                // Get the categories
                for (Category category : (List<Category>) entry.getCategories()) {
                    System.out.println("Category: " + category.getTerm());
                }
            }
        } catch (Exception ex) {
            System.out.println("Error: " + ex.getMessage());
        }
    }
}


pom.xml
<?xml version="1.0" encoding="UTF-8"?>
<project xmlns="http://maven.apache.org/POM/4.0.0"
         xmlns:xsi="http://www.w3.org/2001/XMLSchema-instance"
         xsi:schemaLocation="http://maven.apache.org/POM/4.0.0 http://maven.apache.org/xsd/maven-4.0.0.xsd">
    <modelVersion>4.0.0</modelVersion>

    <groupId>CreateNewFeed</groupId>
    <artifactId>CreateNewFeed</artifactId>
    <version>1.0-SNAPSHOT</version>

    <dependencies>
        <dependency>
            <groupId>org.apache.abdera</groupId>
            <artifactId>abdera-parser</artifactId>
            <version>1.1.1</version>
        </dependency>
    </dependencies>
</project>

Friday, September 15, 2017

WSO2 ESB Filter Mediator

Filter mediator is used to match or filter the message of a given xpath.

If we give only the xpath then it will return true or false. If we give regular expression, the string returned from evaluating the XPath will be matched against the regular expression.

There are two ways of operation

  • Specify the XPath (boolean expression), return true or false
  • XPath will be matched against the regular expression, return true or false

Examples :

<?xml version="1.0" encoding="UTF-8"?>
<proxy xmlns="http://ws.apache.org/ns/synapse"
       name="test"
       transports="http https"
       startOnLoad="true">
   <description/>
   <target>
      <inSequence>
         <property name="statusCode" value="200"/>
         <filter xpath="get-property('statusCode')!='204'">
            <then>
               <log level="custom">
                  <property name="----------Status Code--------------------------"
                            value="status code is not equals to 204"/>
               </log>
            </then>
         </filter>
      </inSequence>
      <outSequence>
         <send/>
      </outSequence>
   </target>
</proxy>

<?xml version="1.0" encoding="UTF-8"?>
<proxy xmlns="http://ws.apache.org/ns/synapse"
       name="test"
       transports="http https"
       startOnLoad="true">
   <description/>
   <target>
      <inSequence>
         <property name="statusCode" value="200"/>
         <filter source="get-property('statusCode')" regex="200">
            <then>
               <log level="custom">
                  <property name="----------Status Code--------------------------"
                            value="status code is equals to 200"/>
               </log>
            </then>
         </filter>
      </inSequence>
      <outSequence>
         <send/>
      </outSequence>
   </target>
</proxy>

Thursday, August 17, 2017

How to share folders between Ubuntu and Windows running in Virtualbox

Step 1 : Create a directory called “vmsharedfiles”  in Ubuntu.

Step 2: Open up virtualbox instance.

Go to top menu and Click on Devices → Shared Folders → Shared Folders Settings.

If you are getting any error like “The VirtualBox Guest Additions do not appear to be available on this virtual machine, and shared folders cannot be used without them. To use shared folders inside the virtual machine, please install the Guest Additions if they are not installed, or re-install them if they are not working correctly, by selecting Insert Guest Additions CD image from the Devices menu. If they are installed but the machine is not yet fully started then shared folders will be available once it is.”, select the Devices option from VirtualBox's menu bar, and click on the Install Guest Additions CD Image option. Guest Additions installer will start automatically.
Follow the instructions to install.

Step 3 : Click on the green folder icon to Add new shared folder option in the right hand side.

Step 4 : You will prompt to the screen to select the folder you created in step 1. Select that folder and click open. And check “Make Permanent” option.

Step 5 : Go to My computer → computer → Map network drive → Map network drive.
You will see the screen below:

Step 6 : Click on Browse to select the shared folder that is created on step 1. Click OK and Finish.


Step 7 : Then this shared folder will be added to the My computer section.


Step 8 : Now you can access “vmsharedfiles” folder  in Ubuntu from Windows 10 in virtualBox.

How To Install Windows 10 In VirtualBox in Linux

Step 1: Download Windows 10 ISO

The first and foremost step is to download Windows 10 ISO. You can download Windows 10 32 bit or 64 bit, depending upon your system.

Step 2: Install Windows 10 in VirtualBox

Start VirtualBox. You should see a screen like the one below. Click on new:

Name the VM. Select the Operating System and version, in this case Windows 10 and 64 bit for me. Choose RAM size. Next is the size for the virtual machine.

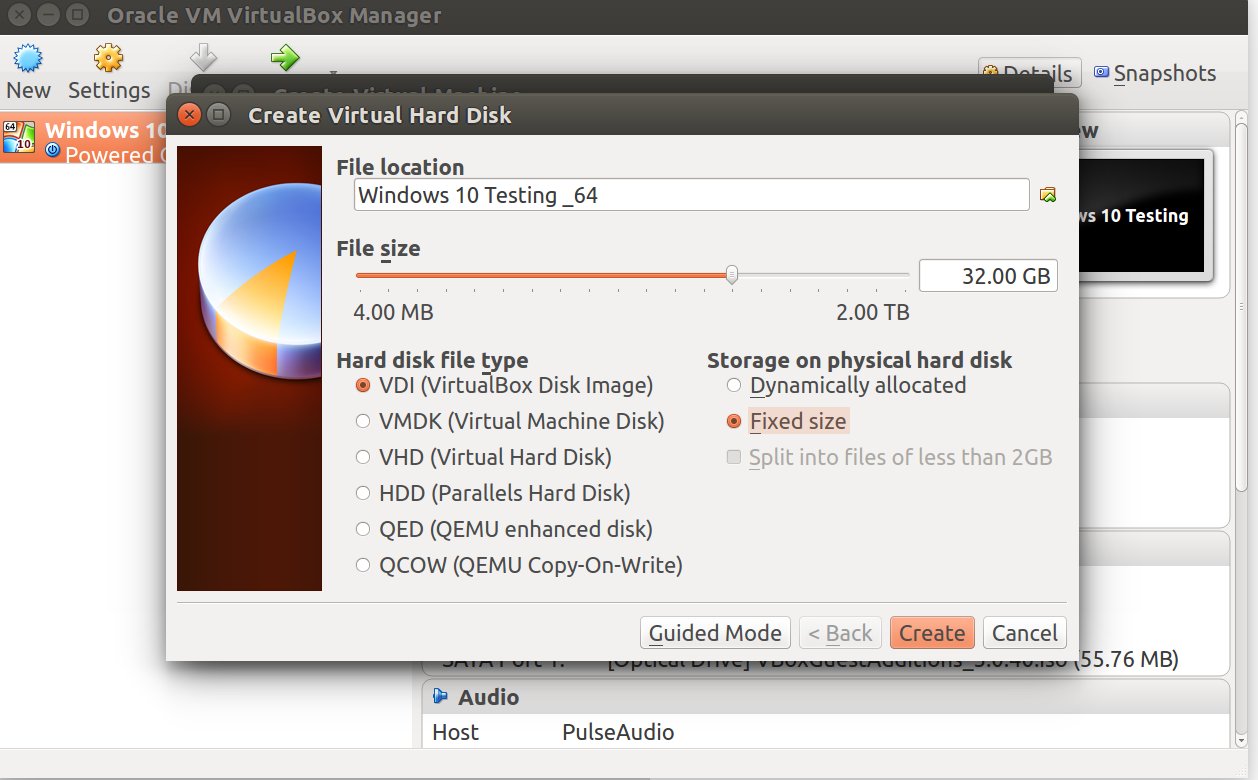
You can choose where to create the virtual disk. Default location (Home directory). For hard disk file type select VDI format.

After successful creation, You should be back to start screen. Click on Settings. Go to Storage and select the Empty disk. Under Attributes section, select disk icon to select the windows 10 ISO file for Optical Drive option.

You should be back to the main screen of VirtualBox.You have everything ready now. Next step is to install Windows 10. Click on Start from the main screen. Now You should see the Windows boot screen: After that you can do normal installation of windows 10.

If you didn’t get the above screen and getting the error as below.

Go to BIOS by press F1. Under security tab select virtualization. Enable VT option.


How to Install Latest VirtualBox 5.1 on Ubuntu 16.04

VirtualBox is a free and open-source virtualization software. It can run on Linux, Mac, Windows.

If you have already installed VirtualBox from Ubuntu repository, remove it with:

sudo apt remove virtualbox

Next, open /etc/apt/sources.list file:

sudo nano /etc/apt/sources.list

Append the following line at the end of this file.

deb http://download.virtualbox.org/virtualbox/debian xenial contrib

Press Ctrl+O to save the file. Then press Ctrl+X to close the file.
Now fetch the Oracle GPG public key and import it to your Ubuntu 16.04 system with the following command so packages downloaded from Oracle repository can be verified.

wget -q https://www.virtualbox.org/download/oracle_vbox_2016.asc -O- | sudo apt-key add -

Then update local package index and install Virtualbox.

sudo apt update
sudo apt install virtualbox

Thursday, March 9, 2017

Invoke Salesforce REST API APEX classes using synapse mediators in WSO2 ESB

Invoke through sample synapse config(API/ Sequence/ Proxy) using following steps :

  • Download the salesforce REST connector from store.
  • Here, we use salesforce REST connector to maintain the access token and get the access token from the refresh token.
  • Open the <ESB_HOME>/repository/conf/axis2/axis2.xml and add the <parameter name="HttpsProtocols">TLSv1.1,TLSv1.2</parameter> entry inside the PassThroughHttpSSLSender element as below :
<transportSender name="https" class="org.apache.synapse.transport.passthru.PassThroughHttpSSLSender">
 .....
 <parameter name="HttpsProtocols">TLSv1.1,TLSv1.2</parameter>
 .....
</transportSender>
  • Start the WSO2 ESB Server.
  • Navigate to the management console and deploy the downloaded connector.
  • Click the Main tab on the Management Console, go to Manage -> Services and then click Proxy Service -> Custom Proxy. Click on switch to source view. Then add following and click on Save.
<?xml version="1.0" encoding="UTF-8"?>
<proxy xmlns="http://ws.apache.org/ns/synapse"
       name="salesforceApex"
       startOnLoad="true"
       statistics="disable"
       trace="disable"
       transports="http">
   <target>
      <inSequence>
         <property expression="json-eval($.accessToken)" name="accessToken"/>
         <property expression="json-eval($.apiVersion)" name="apiVersion"/>
         <property expression="json-eval($.hostName)" name="hostName"/>
         <property expression="json-eval($.refreshToken)" name="refreshToken"/>
         <property expression="json-eval($.clientSecret)" name="clientSecret"/>
         <property expression="json-eval($.clientId)" name="clientId"/>
         <property expression="json-eval($.registryPath)" name="registryPath"/>
         <property expression="json-eval($.intervalTime)" name="intervalTime"/>
         <property expression="json-eval($.inputPayload)" name="inputPayload"/>
         <property expression="json-eval($.httpMethod)" name="httpMethod"/>
         <property expression="json-eval($.apexInstanceUrl)" name="apexInstanceUrl"/>
         <property expression="json-eval($.namespacePrefix)" name="namespacePrefix"/>
         <property expression="json-eval($.apexclassName)" name="apexclassName"/>
         <property expression="json-eval($.urlParameters)" name="urlParameters"/>
         <salesforcerest.init>
            <accessToken>{$ctx:accessToken}</accessToken>
            <apiVersion>{$ctx:apiVersion}</apiVersion>
            <clientId>{$ctx:clientId}</clientId>
            <clientSecret>{$ctx:clientSecret}</clientSecret>
            <refreshToken>{$ctx:refreshToken}</refreshToken>
            <hostName>{$ctx:hostName}</hostName>
            <registryPath>{$ctx:registryPath}</registryPath>
            <intervalTime>{$ctx:intervalTime}</intervalTime>
         </salesforcerest.init>
         <payloadFactory media-type="json">
<format>
                    $1
                </format>
            <args>
               <arg evaluator="xml" expression="get-property('inputPayload')"/>
            </args>
         </payloadFactory>
         <script language="js">//url param variables
                var namespacePrefix = mc.getProperty("namespacePrefix");
                var urlParameters = mc.getProperty("urlParameters");
                //url param processing start
                var urlParamString = '';
                if (namespacePrefix != "" &amp;&amp; namespacePrefix != null) {
                namespacePrefix = namespacePrefix + '/';
                }
                if (urlParameters != null &amp;&amp; urlParameters != "" &amp;&amp; urlParameters != {}) {
                var txt = '{"fieldValuesList":' + urlParameters + '}';
                var obj = eval ("(" + txt + ")");
                for(var key in obj.fieldValuesList){
                var fieldValue = obj.fieldValuesList[key];
                var field = key;
                urlParamString += field + "=" + fieldValue + "&amp;";
                }
                }
                if(urlParamString != '') {
                urlParamString = '?' + urlParamString.toString().substring(0, urlParamString.toString().lastIndexOf("&amp;"));
                }
                mc.setProperty('uri.var.namespacePrefix', namespacePrefix);
                mc.setProperty('uri.var.urlParamString', urlParamString);
                //url param processing end</script>
         <property action="remove" name="Accept-Encoding" scope="transport"/>
         <property expression="$ctx:apexInstanceUrl" name="uri.var.apexInstanceUrl"/>
         <property expression="$ctx:apexclassName" name="uri.var.apexclassName"/>
         <filter xpath="($ctx:httpMethod = 'post' or $ctx:httpMethod = 'POST')">
            <then>
               <call>
                  <endpoint>
                     <http method="POST"                           uri-template="{uri.var.apexInstanceUrl}/services/apexrest/{+uri.var.namespacePrefix}{uri.var.apexclassName}{+uri.var.urlParamString}"/>
                  </endpoint>
               </call>
            </then>
         </filter>
         <filter xpath="($ctx:httpMethod = 'get' or $ctx:httpMethod = 'GET')">
            <then>
               <call>
    <endpoint>
                     <http method="GET"                           uri-template="{uri.var.apexInstanceUrl}/services/apexrest/{+uri.var.namespacePrefix}{uri.var.apexclassName}{+uri.var.urlParamString}"/>
                  </endpoint>
               </call>
            </then>
         </filter>
         <filter xpath="($ctx:httpMethod = 'put' or $ctx:httpMethod = 'PUT')">
            <then>
               <call>
                  <endpoint>
                     <http method="PUT"                           uri-template="{uri.var.apexInstanceUrl}/services/apexrest/{+uri.var.namespacePrefix}{uri.var.apexclassName}{+uri.var.urlParamString}"/>
                  </endpoint>
               </call>
            </then>
         </filter>
         <filter xpath="($ctx:httpMethod = 'patch' or $ctx:httpMethod = 'PATCH')">
            <then>
               <call>
                  <endpoint>
                     <http method="PATCH"                           uri-template="{uri.var.apexInstanceUrl}/services/apexrest/{+uri.var.namespacePrefix}{uri.var.apexclassName}{+uri.var.urlParamString}"/>
                  </endpoint>
               </call>
            </then>
         </filter>
         <filter xpath="($ctx:httpMethod = 'delete' or $ctx:httpMethod = 'DELETE')">
            <then>
               <call>
                  <endpoint>
                     <http method="DELETE"                           uri-template="{uri.var.apexInstanceUrl}/services/apexrest/{+uri.var.namespacePrefix}{uri.var.apexclassName}{+uri.var.urlParamString}"/>
                  </endpoint>
               </call>
            </then>
         </filter>
         <filter xpath="($ctx:httpMethod = 'head' or $ctx:httpMethod = 'HEAD')">
            <then>
               <call>
                  <endpoint>
                     <http method="HEAD"                           uri-template="{uri.var.apexInstanceUrl}/services/apexrest/{+uri.var.namespacePrefix}{uri.var.apexclassName}{+uri.var.urlParamString}"/>
                  </endpoint>
</call>
            </then>
         </filter>
         <respond/>
      </inSequence>
   </target>
   <description/>
</proxy>             

  • Click the Main tab on the Management Console, go to Manage -> Services and then click List. Then click on “salesforceApex”. Under the Endpoints, you can find the http endpoint. With this http endpoint and the following request following payload, you can get the output. Here in this proxy service, we reuse the salesforce REST connector for refreshing the access token.
{ 
"accessToken":"00D6F000001Ndi6!ARMAQPHSxOeI3V1OOtHs8nm4v0cXJGRoqfEMWcPXsPy.1KP.LV_GA8uyM_VTLn3OuI8nWAAsA4Nrq4AGBUTBTBpg0dvEe7fy",
  "apiVersion": "v37.0",
  "clientId": "3MVG9YDQS5WtC11r7PwwtXgMbc11ddO8.v5fACou6XbISTmj5sWLnAFkgpXcjIxCJFtqfDsZL4.yunUQJaohk",
  "refreshToken": "5Aep861..zRMyCurAXnOWvxvIMAnUFVITuyCGAN6mPVNRczzrev5q9h0YI4m45COJYgeLgEorlUMZxm.YAeEE80",
  "clientSecret": "8631600822489897349",
  "hostName": "https://login.salesforce.com",
  "intervalTime" : "100000",
  "registryPath": "connectors/SalesforceRest",
  "apexInstanceUrl":"https://ap4.salesforce.com",
  "namespacePrefix": "TestOrgNew",
  "apexclassName":"AccountRestapiHandler",
  "httpMethod":"post",
  "urlParameters" : {
          "urlParameter1":"value1",
        "urlParameter2":"value2"
   },
  "inputPayload" : {
"AccountDetails":"[{\"getAccout\":{\"Phone\":\"95685695696\",\"Name\":\"TEST\",\"AccountNumber\":\"High\",\"Description\":\"Test\",\"SicDesc\":\"Test\"}}]",
       "TransactionId":"b22518b3",
       "SourceFile":"Sales"
    }
}

Creating REST APIs using Apex REST

The Salesforce REST API allow you to integration with Salesforce applications using standard HTTP methods such as GET, POST, PUT, PATCH, DELETE, and HEAD. This API provides a way to expose the data you have within your Salesforce application to external applications.

Follow steps to create the Apex REST API. Under App Setup expand Developer and click Apex Classes. Click New to create a new class.

Paste the following code into Apex Class Editor:

@RestResource(urlMapping='/Widgets/*')
global class WidgetController {

    @HttpGet
    global static List<Widget__c> getWidgets() {
        List<Widget__c> widgets = [SELECT Name from Widget__c];
        return widgets;
    }

    @HttpPost 
    global static String createNewWidget(String Name) {
        Widget__c w = new Widget__c();
        w.Name = Name;
        insert w;

        return '{"Status":"Done"}';
   }

    @HttpDelete
    global static String deleteWidgetById() {
        String Id = RestContext.request.params.get('Id');
        String status = RestContext.request.params.get('status');
        List<Widget__c> w = [ Select ID from Widget__c where Id= :Id];

        delete w;

        return '{"Status":"Deleted Widget"}' + status;
    }

    @HttpPut
    global static String updateWidget(String Id, String NewName) {
        Widget__c w = [ Select ID, Name from Widget__c where Id= :Id];

        w.Name = NewName;
        update w;

        return '{"Status":"Widget Updated"}';
    }
}