ES6 stands for ECMAScript 6. ECMAScript was created to standardize JavaScript, and ES6 is the 6th version of ECMAScript, it was
published in 2015, and is also known as ECMAScript 2015.
Why Should I Learn ES6?
React uses ES6, and you should be familiar with some of the new features like:
Classes
Arrow Functions
Variables (let, const, var)
Classes
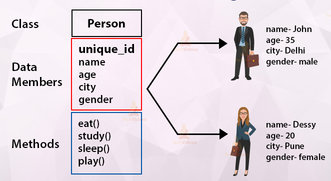
Classes are used to define the blueprint for real-world object modeling and organize the code into reusable and logical parts. Before ES6,
it was hard to create a class in JavaScript. But in ES6, we can create the class by using the class keyword.
A class definition can include constructors and methods. The classes contain constructors that allocate the memory to the objects of a
class. Classes contain methods that are responsible for performing the actions to the objects.
Example
A simple class constructor:
Now you can create objects using the Car class:
Create an object called "ford" based on the Car class. The constructor function is called automatically when the object is initialized.
Note : The keyword 'this' refers to the current instance of the class.
Method in Classes
You can add your own methods in a class. Create a method named "getBrand":
As you can see in the example above, you call the method by referring to the object's method name followed by parentheses
(parameters would go inside the parentheses).
Class Inheritance
Look at the following Animal, Rabbit classes. There are common data members and methods in those classes. So it will lead to code duplication.
We can solve this problem using class inheritance as shown below.
To create a class inheritance, use the extends keyword.
A class created with a class inheritance inherits all the methods from another class.
Create a class named "Rabbit" which will inherit the methods from the "Animal" class.
Calling parent class from child class
The super() method refers to the parent class.
By calling the super() method in the constructor method, we call the parent's constructor method and get access to the parent's properties and methods.
Arrow Functions
Arrow functions were introduced in ES6. Arrow functions allow us to write shorter function syntax:
Before:
With Arrow Function:
It gets shorter. If the function has only one statement, and the statement returns a value, you can remove the brackets and the return keyword:
Arrow Functions Return Value by Default: This works only if the function has only one statement.
hello = () => "Hello World!";
Arrow Function With Parameters: If you have parameters, you pass them inside the parentheses.
hello = (val) => "Hello " + val;
Arrow Function Without Parentheses: In fact, if you have only one parameter, you can skip the parentheses as well.
hello = val => "Hello " + val;
Variables
Before ES6, there was only one way of defining your variables with the var keyword. Now, with ES6, there are three ways of defining your variables: var, let, and const.
var
var x = 5.6;
let
let x = 5.6;
const
const x = 5.6;
const is a variable that once it has been created, its value can never change.
You can refer to this video to learn React js Introduction in Tamil.
React is a JavaScript open-source library created by Facebook. It is not a framework. React is only responsible for building rich user interfaces. React is used to build single-page applications.
React has component-based architecture. This lets you break down your application into small encapsulated parts which can then be
composed to make a more complex UI as shown in the below image. Components make it possible to write reusable code.
React is declarative - We just need to tell React what we want to do. React with its dom library will build the actual UI.
Why learn ReactJS?
Today, many JavaScript frameworks/libraries are available in the market(like angular, node), but still, React came into the market and gained
popularity amongst them. The previous frameworks follow the traditional data flow structure, which uses the DOM (Document Object Model).
DOM is an object which is created by the browser each time a web page is loaded. It dynamically adds or removes the data at the back-end
and when any modifications are done, then each time a new DOM is created for the same page. This repeated creation of DOM makes
unnecessary memory wastage and reduces the performance of the application.
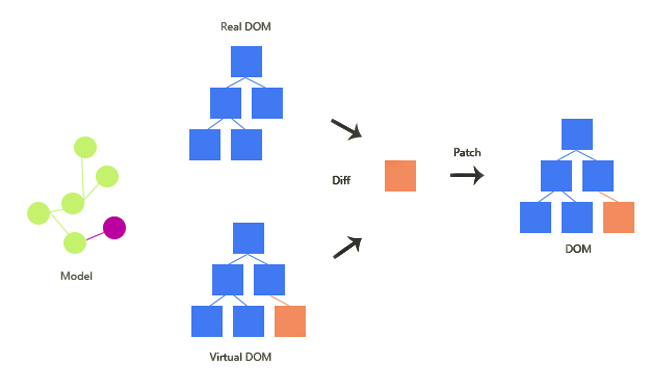
Therefore, a new technology ReactJS library was invented which removes this drawback. ReactJS allows you to divide your entire application
into various components. ReactJS still used the same traditional data flow, but it is not directly operating on the browser's Document Object
Model (DOM) immediately. instead, it operates on a virtual DOM. It means rather than manipulating the document in a browser after changes
to our data, it resolves changes on a DOM built and run entirely in memory. After the virtual DOM has been updated, React determines what
changes made to the actual browser's DOM. The React Virtual DOM exists entirely in memory and is a representation of the web browser's
DOM. Due to this, when we write a React component, we did not write directly to the DOM; instead, we are writing virtual components that
react and will turn into the DOM.
Create react App
Install NodJs and npm
We can use this to quickly create the react application. We can simply run this cmd and the entire project will be created for you. npx is an npm package runner which gets installed when you install node. Since then we are able to run and create react apps without
having to install it. npx takes care of that.
When you start the application, It will open the browser on localhost 3000
Folder structure
package.json - Contains the dependencies and the scripts required for the project.
Eg: React version listed as dependency. There are some scripts to run, build, test the application.
package-lock.json - It ensures the consistent installation of your dependencies.
node-modules - This is the folder in which all the dependencies are installed. It is generated when running the create-react-app cmd.
public -
index.html - Only one html file we are going to have in the application. We are building a single page application. The view might
dynamically change in the browser. But this html file gets served up. We are not going to add any code here. Here,
the react will control the UI. At runtime react will take this div tag and it will ultimately be responsible for the UI.
src -
index.js - Here we’ll specify the root component which is the <App/> component and DOM element which will be controlled
by react. Here the DOM element is the id with ‘root’. The <App/> component will be rendered in the root element.
App.js - App component is present in the App.js. It is responsible for the html displayed in the browser. App components
represent the view we see in the browser.
App.css - For styling which applied in the App.js.
App.test - For unit test.
index.css - For body tag styling.
Components - It represents the part of the UI. As in the previous image we have 5 components. Header, Footer, Side navigation,
Main content, other to contain the above components that is the root(App) component. Each of the 4 nested
components describes only the part of the UI. However all the components come together to make up the entire
application. Components are also reusable. The same component can be used with different properties. It displays
different information. Eg: The side nav component can be left side/right side nav. It can contain other components.
When npx starts executing, the index.html will be saved in the browser. Which contains the root DOM node. Next controls enter to the
index.js, react DOM render the App component into the root DOM node. The App component contains the html which is ultimately